
Last Updated on
Rifles are common and generally useful firearms. They can be learned to be used well enough for most basic purposes easier than handguns, however, any knowledgeable marksman observing typical gun owners realizes most people never get there. The frequent availability and use of the benchrest is a detrimental crutch that usually retards marksmanship skill. With the exception of formally-sanctioned Benchrest competition (NBRSA, IBS, etc.) or gun owners with an actual disability or handicap, benchrests are a deleterious influence and harmful to shooting ability. Here are drills to help you learn how to use a rifle like an able-bodied adult.
Dry Holding Drills
Shooters of low skill often complain dry practice is boring. That’s why they remain at low skill levels. Dry practice is critical to improving marksmanship. In With Winning In Mind, Olympian Lanny Bassham notes that following his gold medal win the Army reassigned him to a location with no shooting range or competition opportunities available. For a two year stretch Bassham made it to a range only six times yet managed to win a World Championship because he maintained a daily dry practice regimen. If it works at World and Olympic championship levels then it will work for us too.
Dry practice is similar to physical fitness training. If your goal is to earn a maximum physical fitness test score, then getting in plenty of good repetitions regularly is key. Even after the goal is met you still need to train regularly just to maintain. The physical component of shooting is the same. Even after a solid technique is developed quality repetitions on an on-going basis are still needed to keep your hand in.
Shooting position quality is largely dictated by hold quality. Assuming it doesn’t disintegrate under recoil or is overly slow to assume, the position that yields the most stable and durable hold is best. Stability refers to the amount of wobble experienced and durability is the length of time you can maintain that hold on a target.
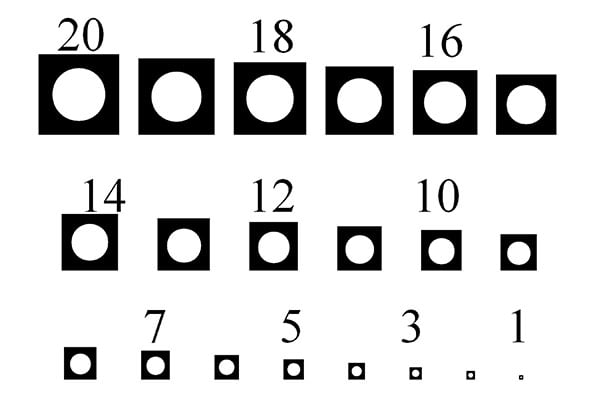
To evaluate this we’ll use a wobble chart, a diagram with aiming marks that contrast well against the sights and are scaled in minute of angle increments. Clear your rifle, assume a shooting position, and aim in on one of the marks, confirming your natural point of aim is centered. Remain in position and watch the sights. The front sight post or reticle should remain within the aiming mark as you hold on it. If so, try a smaller mark, otherwise, go bigger. Once you’ve found an appropriate size, your goal is to refine your position so your wobble will fit the next smaller size.

This is where we learn the difference between a “good” position (one that mostly resembles pictures in the manual or the demonstration at the last class you took) and a truly correct position that, for you, yields the smallest wobble and best possible hold. Don’t press the trigger here, just evaluate and work to improve the hold. There is no magic formula or process to this. Observe the sight’s movement, make a hold or position adjustment you believe will improve stability and/or durability and try again. Are you seeing more sideways or up and down movement? How can you re-position yourself to become more stable? Obviously, bone support is more stable than attempting to muscle the sight into the target, but you need to maintain a minimum level of muscle tension, just not too much, in the right places in order to maintain your best possible hold. What parts of your body are relaxed and what feels tense? How can you relax more and still keep the sight on the mark with a minimal wobble? Like physical fitness, good form should be learned and it helps. The path of progression requires regular, quality repetitions to build endurance and consistency. Get the weapon in your hand daily, take measurements of your efforts and learn from that feedback.
Any size marks can be used provided they step down in incremental sizes but it useful to have them measured in minutes of angle. Let’s say you compete on a course of fire that features several strings from unsupported kneeling at 200 yards against a target with a ten-inch center. Developing a five minute kneeling hold gives high potential to get great scores on this. With an optical sight, use a five minute aiming mark and with iron sights add the apparent width of your front sight to the target size. Strive to not let either edge of the front sight to touch the edge of the aiming mark. A six minute wide front sight held inside an eleven minute mark indicates a wobble area that is five minutes wide.
I prefer to move through dry exercises in circuit fashion, starting with five to ten un-timed dry shots prone on a blank wall and rolling through holds from each position practiced (typically, sitting, kneeling and offhand) for sixty seconds at a time. This constitutes one circuit, with a typical session consisting of about five circuits. Most strings of fire or groups are five to ten shots and one minute is a typical amount of time for sustained/rapid fire strings.
Slow Fire Groups
The real training happens in dry practice. Live fire practice should be viewed as a test and confirmation that dry practice is progressing well. The lack of recoil and noise in dry practice eliminates a major distraction to good shooting, but this must be dealt with which means live practice is still vital.
Group shooting from relevant positions is the most important marksman’s drill, demonstrating the fundamentals are being consistently applied and the zero is good. Both Army and Marines start this on scaled silhouettes printed on a grid at 25 meters which is a sound approach. The problem is they don’t devote enough time to it and the standards for success are too low. A six MOA group somewhere in the silhouette is considered zeroed. Shooting from supported prone, a good shooter can triple this, expecting about two MOA groups with an issue rifle and ball ammo. More precise rifles allow for even better groups.
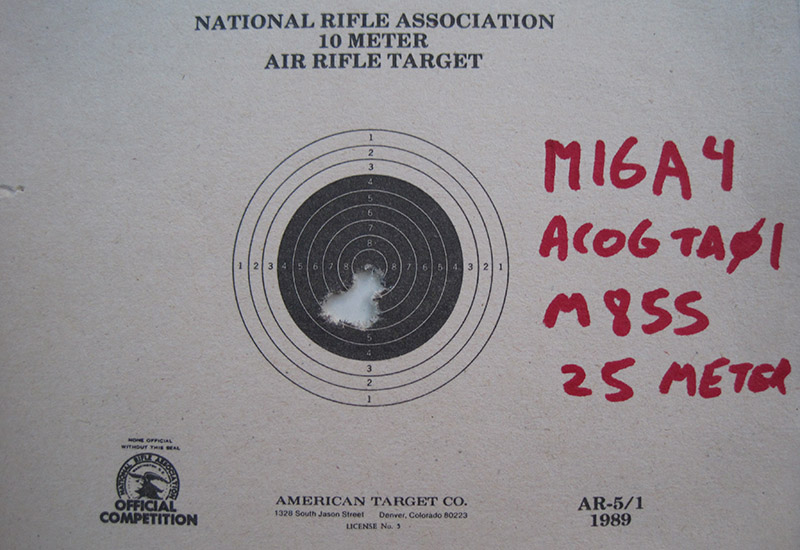
Experiment with different targets and aim points. Formal group and zero exercises and shooting events enforce a specific target but don’t be afraid to try a variety to find what gives you the best sight-to-target reference. Round bullseye targets give a defined, dark circle on a light background that are always right side up on account of their shape. Other geometric shapes can be useful. I usually shoot my best groups with iron sights on the Army’s old zero target, which is a rectangle 10 MOA wide and 4 MOA tall with a 1 MOA square indicating center. When using silhouette targets, white pasters can help create a well-defined aim point. Designated Marksmen instructors sometimes use 3×5 index cards at 100 and 200 yards on E-types to indicate target center and show the offset expected (point of aim to point of impact) with a 300 yard zero, being three inches high at 100 and about five inches high at 200.
Sight Adjustment (“Box Drill”)
By understanding angular deviation and how much your sights adjust, you should always be confident in how many clicks to put on and how much that will move the strike. If sight adjustments fail to produce known, predictable point of impact changes, either the sights or the shooter is broken.
The basic idea is to shoot a group, make a known adjustment to the sights and correctly predict where the next group centers up. Precision shooters do this as a test of the equipment. When shot from position it also tests shooter consistency and their knowledge of the sights.
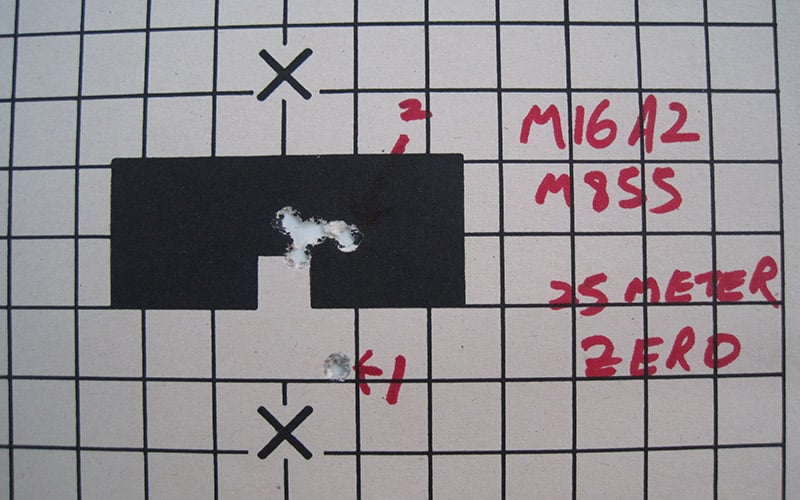
Making a known sight change should yield a known point of impact change. Shooting an issue US Army 25 meter zero target, after establishing a zero adjust the rear sight up five MOA, hold target center and shoot a group. The shots should impact on top of the scaled 300 meter silhouette’s head. Come down eight MOA and repeat. This group should be at target bottom. Going six MOA left or right should put the group on the silhouette’s bottom left or right corner respectively. Returning windage back three MOA and going up three MOA returns to the initial setting and the next group should be on top of the shots from the initial zero.
This works the same way with other firearms. Most optical sights are quarter minute clicks. Using standard graph paper, one click moves one square at 100 yards and four clicks per square at 25 yards. Standard bullseye targets with concentric scoring rings can be measured and translated into how many minutes each ring is worth at the distance shot at.
This exercise proves that the sights work, that the shooter is performing well with reasonably small groups and those groups end up where they’re supposed to.
Continued in Best Rifle Drills – Part 2.


Leave a Reply